


You can click the questions to expand or collapse the answers.
Simply point your browser to http://tclaim.toshiba.com, and log-in using your account number, last name, and password.
Once your account is enabled for tClaim, tClaim will be available under the My Tools windowshade menu on the main navbar.
Since this FAQ is part of "Atlas", it's the same login you already used to get here.
tClaim will be available for you under My Tools once your account is enabled.
Opening a new claim in tClaim is simple.
Start with an entitlement lookup for the unit you're repairing. From the Dashboard, enter the unit's serial number and click the Submit button.
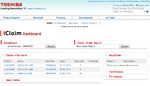
click thumbnail to view full image showing where to enter the Serial Number on the tClaim Dashboard...
On the entitlement page, make sure the unit is still covered under warranty, then click the Create Claim button
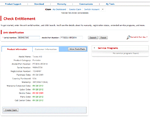
click thumbnail to view full image showing where the Create Claim buttons are located on the Entitlement page...
This will take you to the New Claim page. Fill-in the Date Failed, Failure description, Comments, if you have them, and the Customer Contact Information. When the information you've entered is correct and complete, click the Save Claim button.

click thumbnail to view full image showing where key features of the Create Claim screen are located...
Congratulations. You've opened a new claim!
Ordering warranty parts in tClaim is simple.
First, create a new claim, or locate an existing open claim.
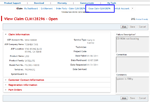
On the View Open Claim screen, click the Order Parts button in the activity bar.
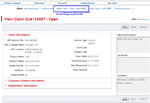
click thumbnail to view full image showing where the Order Parts button is located...
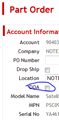
On the Part Order screen, enter your PO number, and you're ready to start adding parts.
To add parts to the order, you can enter the part number, if you know it, and click the Add Part button.
Or, you can select the parts from the list of parts for the unit you're repairing. To view the list of parts, click the Look Up Part button. This will raise the part selection tool.
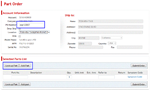
click thumbnail to view full image showing where the Add Part, and Look Up Parts buttons are located...
Locate the parts you need, and click its Add button. To make it easier to locate parts quickly, you can filter the list by part type. Just select the part type you're looking for from the Filter by Category dropdown picklist.
When you have finished adding parts, click the red Close button. This will lower the part selection tool and you'll be back at the Part Order screen. You'll notice the parts you selected are now listed in the Selected Parts list.
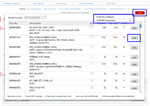
click thumbnail to view full image showing key features of the Look Up Part screen...
From the Selected Parts list, you can remove a part from the order by clicking the red X button to the left of the part number. If you need to add more parts to the order, you can perform another look-up by clicking the Look Up Part button again, as described above.
If you have a PO number, or reference number, you can enter it into the Refer To field for each part.
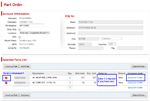
click thumbnail to view full image showing where the remove part button, and Refer To field are located...
Last, for each part in the order, you have to assign a symptom code. Click the Symptom Code button for each part in the Selected Parts List, and select the symptoms that apply.
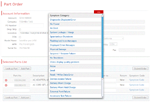
click thumbnail to view full image showing the Symptom Code dialog...
When you're satisfied with the list of parts in the order, click the Submit Order button. This will show the View Part Order screen. It's important to note the Confirmation Number displayed at the top of the page. Toshiba STRONGLY recommends you record the Confirmation Number for future reference.
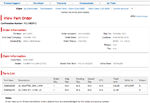
click thumbnail to view full image showing the Confirmation Number on the Part Order summary page...
To return to the claim you were working on, click the View Claim button in the Activity Bar. To order more parts for the current claim, click the Order Parts button in the Activity Bar. To return to the tClaim Dashboard, click the My Dashboard button in the Activity Bar.
Please note that DOA is only available for warranty (claims) orders. For DOA on sales orders, please contact your Toshiba Channel Account Representative.
If a part you ordered for a claim arrives DOA, you can order a replacement. Create a new order on the same claim, and be sure to set the checkmark on the "DOA" checkbox. This will allow you to re-order parts you ordered (and received) on the same claim.
click thumbnail to view full image showing the location of the DOA checkbox on the Order Parts screen...
In tClaim, you can close an open claim after all orders have shipped. If there are no orders, the open claim can be closed at any time.
If you have un-shipped or backordered items on the claim, the claim is not eligible for closing.
To close an eligible claim, locate the claim, either by clicking it in the Open Claims section, or by entering the claim number into the Express Search tool, both on the tClaim Dashboard.
Click the Close Claim button in the Activity Bar. The Close Claim button is only visible on claims that are eligible for closing.
click thumbnail to view full image showing the location of the Close Claim button on the View Claim screen...
On the Close Claim screen, select a technician from the Select Technician picklist. Select a reason from the Select Reason picklist. Enter or select the Date Serviced. Enter a description of the repairs you made to the unit in the Correction field, then click the Close Claim button.
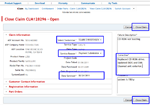
click thumbnail to view full image showing the location of key features of the Close Claim screen...
The claim is closed, and its sumary is displayed.
On the Part Order screen, enter your purchase order number and choose a ship to location from the drop down list.
If you want to ship the parts to an address other than those associated with your your account, set a checkmark on the drop-ship checkbox. An address can then be added in the Ship-To area.
After completing the shipping information, proceed to the Selected Parts List, below.
If you already know the part number you need, enter it in the part number field and then click the Add Part button.
To select from a list of parts for a specific model, click the Lookup Parts button. Enter or select the model whose parts you want to list, then click. After all desired parts are selected, click the red "close" button to close the part selection dialog.
When all parts have been added, and everything is set, click the Submit Order button.